Come eliminare MuseBud
Pubblicato da: Cem OlcayData di rilascio: September 02, 2024
Devi annullare il tuo abbonamento a MuseBud o eliminare l'app? Questa guida fornisce istruzioni dettagliate per iPhone, dispositivi Android, PC (Windows/Mac) e PayPal. Ricordati di annullare almeno 24 ore prima della fine del periodo di prova per evitare addebiti.
Guida per annullare ed eliminare MuseBud
Sommario:
MuseBud Istruzioni per annullare l'iscrizione
Annullare l'iscrizione a MuseBud è facile. Segui questi passaggi in base al tuo dispositivo:
Annullamento dell'abbonamento MuseBud su iPhone o iPad:
- Apri l'app Impostazioni.
- Tocca il tuo nome in alto per accedere al tuo ID Apple.
- Tocca Abbonamenti.
- Qui vedrai tutti i tuoi abbonamenti attivi. Trova MuseBud e toccalo.
- Premi Annulla abbonamento.
Annullamento dell'abbonamento a MuseBud su Android:
- Apri il Google Play Store.
- Assicurati di aver effettuato l'accesso all'Account Google corretto.
- Tocca l'icona Menu, quindi Abbonamenti.
- Seleziona MuseBud e tocca Annulla abbonamento.
Annullamento dell'abbonamento a MuseBud su Paypal:
- Accedi al tuo conto PayPal.
- Fai clic sull'icona Impostazioni.
- Vai a Pagamenti, quindi Gestisci pagamenti automatici.
- Trova MuseBud e fai clic su Annulla.
Congratulazioni! Il tuo abbonamento a MuseBud è stato annullato, ma puoi comunque utilizzare il servizio fino alla fine del ciclo di fatturazione.
Come eliminare MuseBud - Cem Olcay dal tuo iOS o Android
Elimina MuseBud da iPhone o iPad:
Per eliminare MuseBud dal tuo dispositivo iOS, segui questi passaggi:
- Individua l'app MuseBud nella schermata iniziale.
- Premi a lungo l'app finché non vengono visualizzate le opzioni.
- Seleziona Rimuovi app e conferma.
Elimina MuseBud da Android:
- Trova MuseBud nel cassetto delle app o nella schermata iniziale.
- Premi a lungo l'app e trascinala su Disinstalla.
- Conferma per disinstallare.
Nota: l'eliminazione dell'app non interrompe i pagamenti.
Come ottenere un rimborso
Se ritieni che ti sia stato addebitato un importo erroneamente o desideri un rimborso per MuseBud, ecco cosa fare:
- Apple Support (for App Store purchases)
- Google Play Support (for Android purchases)
Se hai bisogno di aiuto per annullare l'iscrizione o ulteriore assistenza, visita il forum MuseBud. La nostra comunità è pronta ad aiutare!
Cos'è MuseBud?
Cem olcay musebud generative auv3 midi sequencer - getting started:
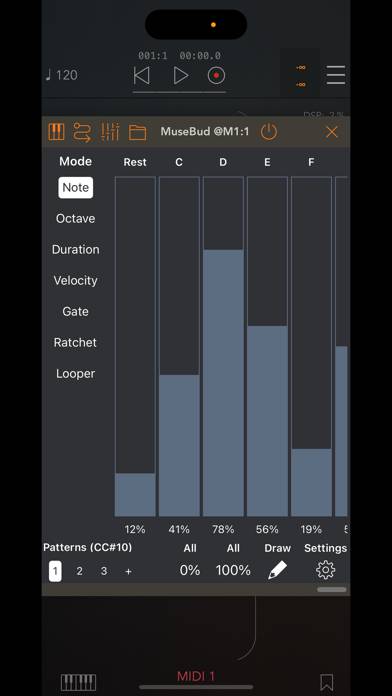
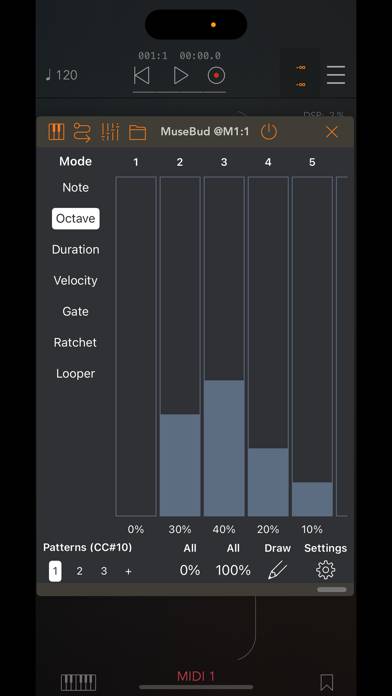
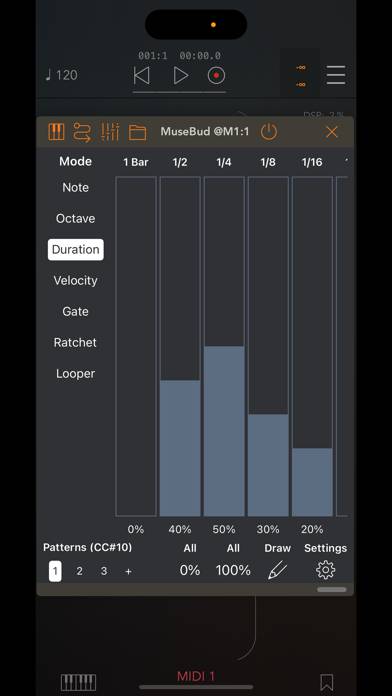
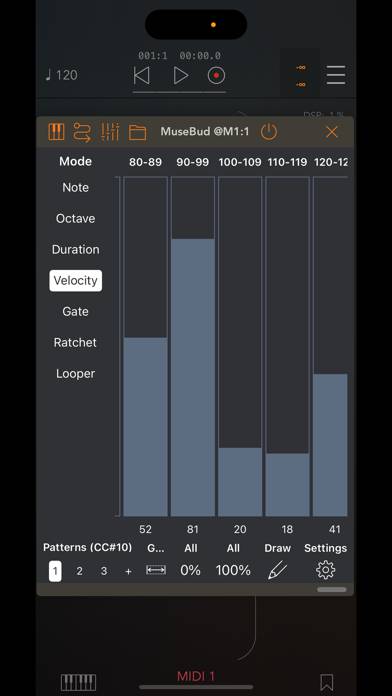
Each mode (note, octave, duration, velocity, gate, ratchet) features its own parameters. Utilize the faders on the main UI to set the likelihood of each parameter being selected by the engine. Easily exclude parameters by assigning them a 0% chance, ensuring they never occur. For quick adjustments, employ the draw mode, 'All 0%' and 'All 100%' buttons on the bottom toolbar.
When you press the play button in the standalone app or the AUv3 host app, MuseBud continuously generates notes. The looper records up to 64 notes in its buffer, enabling you to loop back a preferred section in the sequence. Set the start point and step count of the looper in the buffer. Pressing play on the looper stops generating new notes and begins looping the selected section. When you stop the looper, MuseBud resumes generating new notes. Toggle the record button on the looper off to prevent recording new notes into the buffer.
Edit steps in the looper by simply tapping the desired step to delete or edit, and choose an action from the popup menu. In the step editor, modify properties assigned by the engine, such as note, duration, octave, velocity, gate length, and ratchet count.
Generate various patterns for multiple generative sequences. Each pattern comes with its own looper buffer. When creating a new pattern, it automatically duplicates the current one, ensuring you can craft multiple loops without losing your randomization settings.